Monday, May 27, 2019

Dither, dither, dither


In between house projects (the outside trim on the porch windows is complete – yay!), weeding, basic household stuff like laundry, and going to work, I have actually gotten some good stitching time in over the last week or so. 

The semi-rotation has been working well so far, but I’m now about to put it to a real test (more on that later).

I’ve finished LHN’s Season’s Greetings, changes and all (insert quick little happy dance here).


Mary Goodwin has become my weekday evening piece … when I have enough energy or brain left to stitch on what I still think of as school nights.  A few more letters have been added since this picture.


I’ve worked on Goat Load and on With My Needle’s Acorn Sampler Bag, but both these projects have had … issues.

I had picked out two pieces of 32 count linen as possibilities for Goat Load, but rejected first one and then the other after doing a handful of stitches on each – that bitty goat at the top simply was not going to show up when viewed from farther away than one's nose.  So I dove into my linen bin but found no small pieces of 32 in a good color.  Held my breath and cut (eeek! cutting into Larger Linen!!) a 4-inch strip from a nice long, 9 inch wide piece, and started stitching.

And wondered why my stitches looked so bad.

Said a few choice words and checked stitches against my ruler and then said a few more not very nice words – the 32 count was not.  It looks like it's 35 (explaining the problem with how my stitches looked), though a quick check with my little ruler is all I've done.  Hauled out the linen bin once again, this time opting for a darker, unbleached linen in 27-count.  The little guy is showing up better on the darker fabric, and my stitches look much more like nice little Xs now.  


And then there’s the Acorn Sampler Sewing Case/bag.  When this pattern first came out, I was very excited about it and ordered the fancy, called-for linen – Lakeside Linen Autumn Gold in 32-count – something my LNS did not carry. 

I was completely dismayed when the linen arrived in my mailbox – it was orangey-tan.  A quite dark orangey-tan.  Looking at the photo with the chart again, I figured what I received was a dyelot oddity and ordered another piece from a different shop.

With the same result. 

At this point I decided that the particular piece of fabric Ellen used must have been from a much lighter dyelot so the first chance I got, I was off to my LNS.  (Oh, to still have that LNS only 20 minutes away!!  What bliss to have been able to see and feel stitching fabric before I bought it!)   Seriously, does this fabric look dark orangey-tan to you??


Using the photo from the chart as a guide, the shop owner and I picked out two or three possibles, did a floss toss, and I came home with fabric that looks like a very light natural with a barely golden tinge – perfect!!

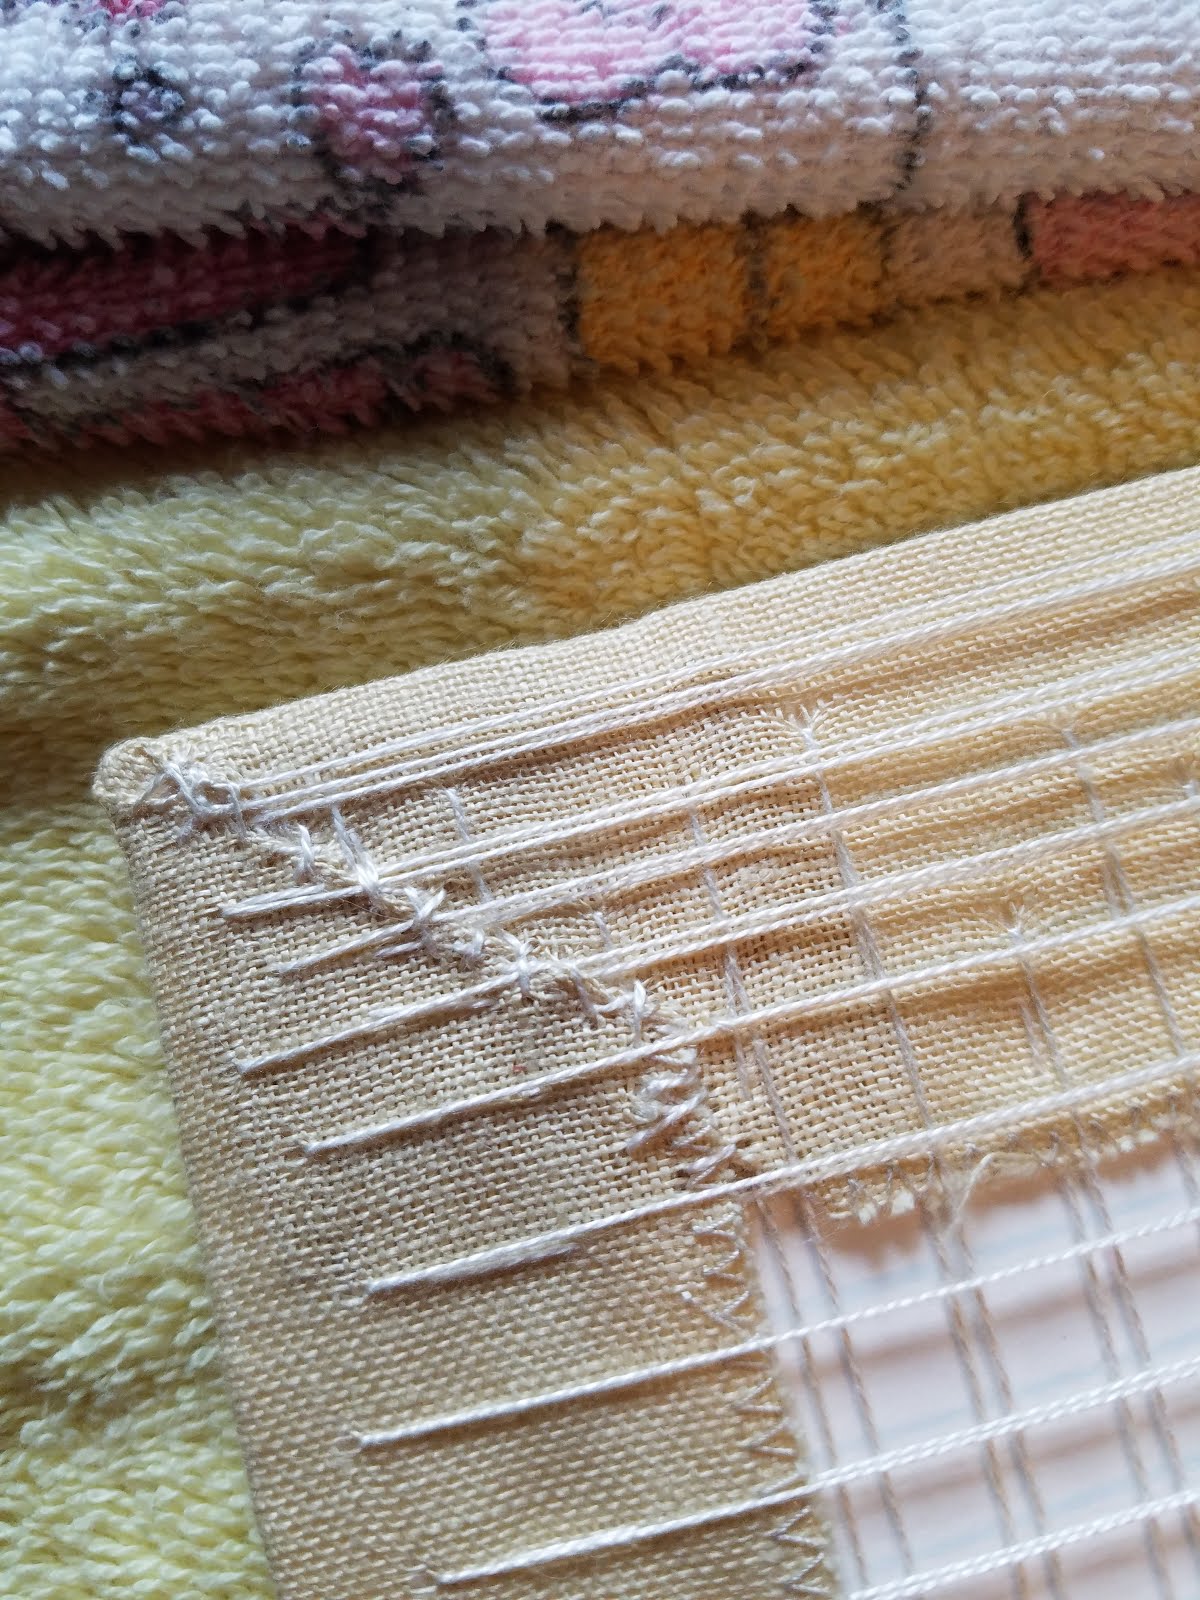
Since Ellen suggests using a varied collection of specialty stitches for the acorn caps, it seemed best to stitch only the vine to start.  Said vine has a rather long repeat and my eyes didn’t track it nearly as well as it seemed - the right side had an error discovered only after I was at the bottom.  Frog, frog…. 

Not sure if it’s the linen I'm using (which seems very tightly woven) or just that it’s on 32, but this is giving me the same feeling as 35/36 count sometimes does – two strands of floss feels like too much but one strand isn’t enough.  Geez, how many times do I need to change fabrics on this project???


I’m stalled at this point and thinking 28-count in a light natural would be better.  On 32, the finished width should be 5 1/2 inches while on 28 count it would be 6 … and I won’t ever complain about a stitching bag being a touch larger!! 

Thoughts?  Opinions??  Please let me know your ideas on this one!

Now to the test of my semi-rotation.  With the long weekend coming after a Friday spent running around like a headless chicken (short version:  one of my two bosses left at the end of November and we had a candidate in for interviews – guess who coordinated and had to make all the on-the-fly changes?), it seemed the perfect time to start Betsy Davis.  Great reward, right?

Betsy’s been in my stash for a long time, and while I originally bought her with DMC, a year or two ago I decided I wanted to stitch her in silks, and Marsha was happy to sell me the right colors and quantities.

After four stitching sessions – two yesterday…


… and two more today, here’s where Betsy stands.


Why is Betsy a test?  After waiting so long to start her (and I think I’ve wanted to stitch her since I first saw her years and years and years ago), it will be hard to work on anything else!

Thanks for letting me ramble on!


>^..^<

Tuesday, May 14, 2019

Weekend work


These are not the pictures you’re looking for.  At least they’re not if you’re hoping to see what progress I’m making using my sort of a rotation - I still need to take those.

I had hoped to spend a goodly part of this past weekend stitching, but as it turned out, not so much.  You may remember (or not) that last August through the fall, Wonderful Husband and I were working on our porch, repairing the original, somewhat shoddy work and replacing screens with windows.  We had replaced the storm door and installed all the windows (14!) before the weather became too cold to continue.

Since I really don't expect you to remember our Harry Homeowner projects, here’s what the wall with the door (otherwise known as the south wall) looked like in September.


You can clearly see the window “fins” used to attach the windows to the porch structure – we knew we had to cover these with some sort of trim, but since we tend towards being seat-of-our-pants workers when we’re doing a new type of home repair/update, we had no plan for how that would come about.  Lovely?  Most definitely not.


I knew Wonderful Husband spent periodic blocks of time over the winter pondering how to make the trim look nice as well as coherent and uniform.  And now I’m thinking it was a good thing the weather got cold, since his winter pondering yielded an excellent solution. 


One huge … er, glaring reason all his pondering was necessary is that these are the first windows we ordered and installed.  The helpful people at Home Depot told us the job would be far easier if we ordered custom sized windows rather than doing lots and lots of (labor intensive) fussy trimming out of the window spaces to make them all match.  But that seat of the pants thing came back and bit us in the pants when we realized that regardless of width, we should have ordered all the windows at the same height.  (Which we did on the other two sides of the porch – at least we are capable of learning!)  The difference between the tops of these two windows is - ugh! - an extremely obvious half inch.


Uh oh.  That height discrepancy is definitely Not Pretty.  And could easily be a Big Problem.

Here’s the same spot as of Sunday afternoon.  Of course now that you know what to look for, you can still see the height difference, but scroll back up to take another look at the full picture of these two windows.  I'm delighted with Wonderful Husband's clever camouflage!


So, woohoo – let’s hear it for winter pondering!!


>^..^<

Sunday, May 5, 2019

I've been working on stuff.....


I want to thank everyone who commented on my earlier post and made suggestions about what to stitch next – I really appreciate every bit of input!

If you’ve been reading my blog for a while, you know I tend to be a monogamous stitcher.  This can be good because I don’t end up with a lot of WIPs/UFOs, but it can also be bad because when I get sick a bit tired of a project and don’t want to work on it, it can mean not stitching at all.  Which is Very Not Good.

Hand in hand with that particular tendency (failing?), I’ve never really done well with rotations.  But there’s a first time for everything, right?  Perhaps the issue is that any previous rotation I’ve tried has not been structured in a manner that worked for me.

Thanks to my indecisiveness, I’ve come up with a sort of rotation that I think might work.  Either that, or I’ve just found a way to justify starting a whole lot of different project starts!

Since I don’t normally stitch every day, a rotation that assigns each day of the week a different project is … not optimal.  Here’s what I came up with:


As you can sort of see, each project has several lines of empty blocks, arranged in rows of five, and the plan is this:  Every time I work on a project, I note the date in its next open block.  If I feel like working on that same project the next night / next time I stitch, that’s fine, but if I want to work on something different, that’s okay too.  If I work on the same piece five stitching days in a row, I will consider moving to another piece the next time I stitch, but I don't have to change. 

My hope is that this not-really-a-rotation will satisfy my desire to plug away at one thing, but also spice things up a bit and keep me from getting tired of whatever I’m working on.  And I might even get more projects completed.

So far, this non-rotation rotation has generated two new starts.  That’s two new starts in one week.  And there are several more projects ready to go and just waiting to be added to the list.  I just need to make sure to keep at least one small project going so that I get an occasional finish.

The new starts?  Mary Goodburn and the Acorn Sampler Sewing Case - pictures soon!  Goat Load is kitted up and waiting its chance, and the Cluny Unicorn is all contained in its own tote bag but needs a bit more prep work.  Silly me did not realize that NEARLY EVERY SYMBOL on the scary, solid -coverage chart is for a BLENDED needle.  When that little item of information finally hit home, I ordered the floss label stickers that go with the chart.  These dodads go on one’s floss bobbins and show the chart symbol plus the DMC thread numbers that make up that color.  I’m thinking a weekend afternoon playing paper dolls putting stickers on floss bobbins is in order before putting a needle into this mammoth project.  Gridding at least a section of the fabric may also be in order. - do you ever do that?

I’m also thinking that Betsy Davis needs her own bag as she is currently in a very thick pocket folder and will no doubt require more space once begun (I know I have more tote bags somewhere…).  Yes, I’m itching to start working on her too.  Perhaps I’ve gone crazy in my old age.

Or maybe I just want to make some more progress on my far-beyond-SABLE stash.


>^..^<

Sunday, April 14, 2019

And now for ... what?


Lately I’ve been working on LHN’s Seasons Greetings when I have both the time and energy to stitch, which has been far too seldom recently.  And while working, my mind is greatly occupied by the what-to-stitch-next conundrum. 

I’ve rooted through the main stash as well as the readily-to-hand stash (this is a real and very intentional distinction).  Of course I want to stitch it ALL, and fondling perusing all the pretties makes me want to stitch it all RIGHT NOW!!

There are … I suppose I could whittle it down to four.  There are four things I want to start.  Two are samplers Wonderful Husband gifted me with, one is a full-coverage piece (also a gift from WH), and the last is another sewing case.

Oh, better make that FIVE.  I have succeeded in acquiring the chart for Goat Load from Plum Street Samplers and want to stitch it over one as a Christmas ornament since goats are the subject of a longstanding joke between Wonderful Husband and myself. 

But how do I decide??!!

What’s that?  You can’t give out advice without seeing what I’m talking about?  Okay.

Sampler #1, aka Mary Goodburn
Not tiny, but all cross stitch and should stitch up relatively quickly.  And Mary looks like a fun stitch with lots of bright colors.


Sampler #2, aka Betsy Davis
Can’t work on this one in the winter since my hands get so dry I’d shred the silks, but it IS springtime now.  In my personal classification system, Betsy falls under the Large and Complicated heading.  She is supposed to finish up at 13 by 15, and even though she’s on 25 count (which will likely feel like I’m working on burlap since I normally prefer higher count fabrics), she will undoubtedly take quite a while to stitch.  No new stitches to learn, but there are lots of Queen stitches (which I like, but they're time consuming) plus sections that are freehand embroidery (why does that worry me so?).  Not sure I want to do another Large and Complicated yet, but I’ve loved this sampler going on twenty-five years now….


Full coverage – Cluny Unicorn detail
When I start this, it will be with the knowledge that I will NOT be monogamous with this piece, even though I’m essentially a one-at-a-time stitcher.  I’ve never done a full-coverage piece before and know I will need breaks.  Perhaps a great many breaks.


Ellen Chester’s (With My Needle) Acorn Sampler Sewing Case
Um, yes.  Apparently I *need* to have a sewing case in process.  While this piece has been kitted for several years and has been in my easily-accessed, do-these-really-soon project bag for well over a year, now that I’ve finally finish-finished a sewing case, this one’s voice has gotten considerably louder.  Perhaps it’s all those squirrels….


Goat Load
This should be a reasonably quick stitch, even over one.  But this small project will require Thought prior to beginning.  Many of the called-for colors are Classic Colorworks (Crescent Colours), and since my stash contains very few of those threads, substitutions will be necessary.


Oh wait.  Forgot about this one.  If you blow up the picture, you can see that I wrote “completed 13 July ‘92” on the pattern.  I really did stitch this guy.  I know where I worked on him most often (on the bench by the caboose in downtown Vienna , Virginia, where we used to live, stitching and keeping one eye on the kids as they clambered all over old railroad car), and I specifically remember doing his beard and adding the stars once the regular stitching was done, but as I was undecided about how to finish the back, I never cut him out.  Instead, I put him in a Safe Place.  He’s in such a safe place that I’ve looked in every reasonable place and a number of unreasonable places with no sight of the guy. 

Actually, I feel pretty lucky that I found the pattern and picture and for several years they were in hiding also!  I do have some tan perforated paper in the stash, so I’d just need to match DMC colors to the picture – you can see that the colors have names only in the thread list.  I have several other early kits in this series, but haven’t been able to bring myself to do any of the others until this first one is complete.


Thoughts?  Suggestions?

Thanks for stopping by and listening to me ramble.


>^..^<

Wednesday, April 10, 2019

At long last....


Rachel at Ten Hour Stitcher (LINK) is our host for this compltely brilliant SAL.  Thanks again, Rachel, for the much needed kick in the pants! 

This one requires a little history.  In 1995, I was able to attend the Spirit of Cross Stitch Festival in Valley Forge.  It was the second time I’d gone to SOCS and this time I not only knew what my class projects looked like *before* class started, I was prepared for the awesome merchandise mall.  By that I mean I was ready to look for charts and supplies for classes from a previous year that I’d fallen in love with.  One of the charts I picked up was Merry Cox’s Sampler Sewing Case.  After a minor debate with myself, I also bought the SOCS video class with Merry since the project was a similarly designed sewing case.

Understand that the intent behind purchasing the video was to get detailed finishing instruction for the other chart – I had no intention of stitching the case in the video.

Are you laughing yet?

Of course at some point after finishing the first sewing case, I ended up contacting Merry in order to acquire her materials kit for the case in the video.  The original sampler case was stitched in 1997 and fully finished shortly thereafter.


While working on the second sampler case, I decided I wanted it to be different from the first one – my chart has so many notes and ideas in the margins!  The plan was to turn Merry’s normal mattress pincushion into a pocket.  And oh, while I’m at it, let’s make the needlebook a bit snazzier too.

Stitching for this small was finished in (*cough*) 2003.  Ever since, it’s been rolled up and tucked carefully into my (Merry Cox SOCS class) Shaker Box with a number of my completed smalls, patiently waiting for me to go through my making-quilts frenzy and come back to stitching.

 
(This is Merry’s case – screenshots from video class)

A few years ago I got a bug to finish the sewing case.  For some reason, I’d thought it was larger than the first case.  Nope.  As charted, it's not even as big as the first one.  So there was pondering as to how to enlarge it without losing the original feel of the project (and also without broad expanses of blank linen).  I trawled eBay to acquire more of one of the project threads, DMC flower thread (long gone from LNS inventories), then planned and stitched a border.

And then I got cold feet.

Really, what had I been thinking?  A tool-holding pouch with a flap closure in this itty-bitty case?  Back into the Shaker box it went so it could … age a bit more.

Enter Rachel’s SAL (*whoops and cheers and applause*), which got me seriously thinking about this project again.  Preparing to work on the project required some serious advance planning steps, beginning with figuring a way to transfer the video file to my laptop which does not have an integral DVD drive.  Hey, at least it was *on* a DVD rather than a now-useless VHS tape thanks to Wonderful Husband.

For the past few weekends I’ve disappeared into the back bedroom (where sewing machine, ironing board, and other essentials reside) for an hour or so a day.  Yes, in addition to being a slow stitcher, I’m a slow finisher as well.

Now when one is off the instructions map, one needs mock ups and templates to ensure plans and ideas work.  Especially when one’s design is way too fancypants for one’s own good.


That tiny bit of paper with staples is my pocket model and the other paper is my pattern.  I even basted the pieces to the outer case this time!


I changed the poem just a touch since I saw no reason to break words across two lines.


On the inside bits, I stitched the letters over one so there would be room for more information ... and so I could put designs and words on the undersides of those flaps.  I also added a strap to better secure my scissors - when Merry shows off her Sampler Sewing Case #1 in the video, you can see she made a scissor strap for that one, though I don't think it's called for in either pattern.


Rather than nun’s edged linen needlepages, I used felted wool to better protect my needles and pins from rust - our climate is more humid than I'd like.


Here's that pesky double pocket that took so long to go from wisp of idea to reality.


Even though I didn’t want to add all the bows that Merry used on her case, I thought the waxer pouch was a good place for the little bow charm.  The drawstring on the other pouch is made from some of the silk ribbon provided to make those triple bows (see pics of Merry's case) – they were a bit too frou-frou for me.


Happy dancing!  Certainly it took me long enough to finish this piece, but I'm generally pleased with the result.

Thanks for visiting with me today, and for allowing me to ramble.


>^..^<


Saturday, March 9, 2019

Finished sampler – happy dance!


The Catherine Theron 1840 Town House Sampler is complete!  I started this to be a respite piece while working on Jane Turner, intending to finish a band on Jane, then do a section of this sampler (vine, strawberries, alphabet…), then work another band on Jane.  But with nearly every band finish on Jane, I was excited to start the next band, so this little sampler lounged about unattended for quite a while.

I picked up this kit at the Spirit of Cross Stitch Festival in 1992 - several years earlier I’d fallen in love with Catherine’s designs and with those nifty new overdyed flosses she made and used.  Being a child of suburbia, I always thought the name of the sampler a trifle odd – that sure doesn’t look like any townhouse I’ve ever seen!


At some point, I read the info included in the kit. Likely this falls under the heading of “when all else fails, read the directions.”

This piece was designed using several samplers from the collection of the Historical Society of Glastonbury.  The strawberry border is an adaptation of a sampler by Harriet M. Porter “marked in the summer of 1846 aged 13 years P. Skinner instrss.”

The building depicted is my rendition of the Historical Society’s building.  This edifice is the original Glastonbury Town House built in 1840.

Ah, it’s not a townhouse – a row house, as my father used to call them - it’s a Town House, a government building!  (sigh)  Curious at this point, I had to see what this building really looked like, especially since I’d always felt the door was a bit off. 


Hmmm… that’s lower, wider, and has a less steeply pitched roof.  So the Town House on my sampler is *my* interpretation of the actual building.  I made some other changes too - keep in mind I started this while working on Jane Turner, so even though the piece called for plain cross stitch with just a handful of Algerian eyelets, I had to add some more fancy stitches.

On each side of the border, one large strawberry is stitched in Smyrna cross and one small berry in tent stitch.  Within the alphabet, I stitched my initials in eyelets (something I once saw recommended by Eileen Bennett).  Which seemed a great idea until I realized that I’d stitched the “H” in the wrong color.  I discovered that frogging eyelets over two threads is very like frogging cross stitch over one, so the wrong color stayed.


I added a gold overdyed thread (left over from stitching another Catherine Theron sampler), changed the filler motifs, and made the tree more densely leafed.  Also added more grass.  The last dividing band was to be all Algerian eyes, but I thought it would look neat to make a pattern of those and full eyelets.  Not the best idea, probably.


I tried to show the triangle of recessed brickwork above the doors.  You can really only see the difference the tent stitches make when you’re right on top of the sampler, but I’m still pleased with it.  You can see some of those random berry changes here.


This is a small sampler - stitched area is less than six inches by about eight and a half.


The 1840 Town House Sampler
stitched on 28 count linen (don’t know color - provided in kit)
GAST and DMC Flower Thread
started April 6, 2017
completed March 1, 2019

Thanks for visiting me today!


>^..^<

Wednesday, March 6, 2019

TUSAL March 2019


CLICK HERE to go to Sharon’s It’s Daffycat blog to read all about the Totally Useless SAL and discover why I’m posting pictures of thread snippets, otherwise known as orts.    

How can it be TUSAL day already?  I was thinking there was another week to go and nearly missed it!  The Silly Stitching Calendar says that I’ve had 15 stitching days since the last TUSAL check in, and I have two piles of orts to show off.


I’ve finished Catherine Theron’s 1840 Town House Sampler, but have plenty to say about it and think it deserves its own post - hopefully in a day or two.  The larger batch of orts belongs to that sampler.

The tiny bunch of orts (I don’t think qualifies as a pile, really) is from Season’s Greetings, a Little House Needleworks ornament that’s been sitting neglected for maybe a year.  The other night I finished the frame and had worked one section of the branch, delighted with how quickly it was going ... and then realized it was in the wrong place (hello, frog).  This should finish up quickly, but I really want to figure out what larger piece to work on next before it's done.


Happy stitching everyone – thanks for stopping by!


>^..^<

Friday, March 1, 2019

Lacing a Lady


Since you asked about the lacing for Jane Turner, I wanted to share the resources I found when getting ready to work.  Well, whatever I asked my good friend Google to find when I first looked, I was completely unable to replicate it.  When preparing to lace Lady Jane, I read a number of online answers to “what kind of thread should I use?” and the most repeated answer was perle cotton.
  
THIS LINK *might* be one of the sites I found before – at least the post mentions (perhaps just implies?) using a single strand to do the side-to-side lacing and a second single strand for top-to-bottom.

Anyway, other than securing the corners, YES - Jane is laced to her mounting board (acid-free foam core) with just TWO lengths of perle cotton.  

While I've laced all the cross stitch pieces I've framed, I had not tried this single-strand method before.  Noah is in a 16 by 20 frame (I think), and that's laced using dental floss with a fair number of starts and stops - probably ten to twelve of floss each time.

Anyway, back to Jane.  Starting in the center of the longer dimension is what I normally do.  Pull a yard or two of perle cotton from the ball and thread your needle onto the end.  Do not cut the perle cotton and do not anchor it into your fabric.  Go back and forth (er … side to side) several times – three or four stitches – and then very gentle pull more thread through each stitch you’ve taken so that you again have a length of thread to work with.  Take three or four more stitches and again work the thread through all the stitches you’ve made.  After you’ve used up what you’ve pulled loose from the ball of perle cotton, unwind several more lengths.

Yes, this is EXTREMELY tedious!! 

When working on Jane, I would do three or four “pulls” at a time from the ball of perle cotton, and then work that through all stitches taken till I got to the place where the needle was.  To be more specific about what I mean by a pull, I would hold the perle cotton ball down on the work surface with one hand and pull a length out with the other hand until my arm was fully extended.  So for me, a pull is a bit more than one yard.

Oh yeah, since you start in the middle of the side, it’s a really good idea to try to keep count of the “pulls” you take from the ball.  Once you get to the end you’ve been working toward, make sure you have a foot or two extra thread at the end, then remove your needle from the thread.  Now comes the really fun part.

Since you’ve been keeping count of the number of pulls you’ve taken from the ball of perle cotton, you know how much thread to pull off the ball to lace the other half of your piece of needlework.  This will likely convince you that I am completely nuts:  make the same number of pulls from the ball of perle cotton as you used to lace up half of the side of your stitched piece, being very careful about how you lay this down on whatever you’re using for a work surface – you really don’t want this to get tangled up.  Add a few more pulls as a safety margin, then cut the thread and thread your needle. 

At this point, you go back to taking three or four stitches from side to side and then working your thread through.  Since there was an enormous, piled-up bunch of thread, I’m pretty sure I did three or four stitches, worked just a couple of yards of thread through, then took three or four more stitches.  The huge pile of thread tangled up twice and I very carefully picked out the knots both times – with this much effort invested, I was determined it would be a single length of thread!

Tedious. 

Have I said tedious?

I probably should have started out by saying the pins holding Jane to the mounting board remain in place while lacing.  I kept a towel folded over the pins as much as possible so as not to snag the thread.


After reaching the other end and finally cutting that thread, it’s a good idea to turn your needlework over to make sure it looks the way you want it to.  If it’s not perfect, you can still make small adjustments at this point by removing pins and scooching the ground fabric one way or the other, then repining.  When it’s just right, it’s time to tighten up the lacing, once again starting in the center and working to each end.  When the entire side was snug, I anchored the thread.

I followed the same process to do the lacing top to bottom.  Various online references I found said mitering the corners is not necessary, but I’ve always done that, so Jane’s corners are mitered and stitched down.


This was undoubtedly way more detail than anyone was looking for…  If you’ve made it to the end, thanks for staying with me!


>^..^<

Tuesday, February 19, 2019

Jane Turner, afterword


As you can see, Jane Turner is now proudly hanging on the wall.  She’s in the living room, just beside the room’s entrance.  Not where I had envisioned her, but Wonderful Husband pointed out that in my chosen location, rather than catching my eye each time I walked by, she would be shadowed and invisible for a good portion of the year.  Sigh.

I did mount her myself, probably more from paranoia than any other reason – I couldn’t even think about handing her over to anyone else without getting queasy!  Here’s the frame I picked.


I used to use unflavored dental floss to mount needlework, but thought I’d see what was recommended and after some internet research, decided on using perle cotton.  After getting my work space prepared, I did the requisite blocking and measuring.


And pinning to the foam core…


… and repinning after turning things front side up.


Of course Harley wanted to help.


Giving in to my overachiever side, I decided that the "recommended" single looooooooooong strand of perle cotton lacing left-to-right and another single stand top-to-bottom was the best way to handle mounting Jane.


Have I mentioned that Jane's 24 inches tall?


I don’t know how a professional laces needlework onto a backing board, but I figured that over time, in-out-in-out would be a lot better for Jane than a single stitch passing through the linen, since this would put much less stress on specific spots in the fabric.


Starting in the middle allowed me to estimate the length needed for the other half - I tried to keep count of how many "pulls" I took.  And it worked ... pretty much, anyway.  I’m pleased with how little of the perle cotton was wasted.  It took nearly an entire ball to do the job.  The full ball below is for comparison so you can see how much was used, and the loose snippets are the bits that were cut off.


Of course the corners are miter-folded.


After a couple of hours (oh, my tired back!), she’s ready for the frame!


Wonderful Husband helped by drilling tiny holes for the small screws used to mount the hanging wire.


Do you get the Scarlet Letter’s newsletter?  If not, this may seem a bit odd.  When the Grace Kemish sampler was from her frame, Marsha discovered that dozens of bay leaves were inside the backing/dust cover.  The stitcher must have known they are a natural bug repellent.  Cool, huh?  Adding some seemed like the right thing to do (hey, it worked for Grace for 200 years!), and we have a *big* container of bay leaves, so I figured, why not?


I filled out and used the little tag supplied by The Essamplaire, and added a brief note of my own, then glued the dust cover to the back of the frame and weighted it.


I may not be making quilts any more, but I know how to put my book and magazine collection to good use!


And here she is in all her framed glory!


Would you believe after all the care taken in getting the stitching mounted properly on the foam core, all the pinning and repinning and checkingcheckingchecking, I didn’t turn the frame over before putting on the backing paper??  Argh.  Yes, I think she is the tiniest bit crooked in the frame.  I will remedy this at some point, but don’t have the heart to do so right now.


>^..^<